GOOD MORNING FRIENDS! Just finished up another class at Photo Scraps yesterday featuring different techniques and products to use with stencils. Everyone had a good time and hopefully will be inspired to incorporate stencils into their projects.
Since I ran out of paper AND printer ink when I was preparing the card kits, I wasn’t able to give everyone my usual handout listing all of the products. So as promised I am following up today with the product information. Tracy and Lisa asked that I offer another stencil class later in the year. Stay tuned! I’m thinking about ways to incorporate stencils into holiday cards!
And be sure to join me TODAY from noon to 3:00PM at the Photo Scraps Yard Sale. Arrive early for the best deals!
Supplies
Below are the supplies I’ve used for today’s project. All items were personally purchased except those marked with an asterisk (*) which were provided by a store or design team. I never share a product I do not like. All opinions are my own. Read more.
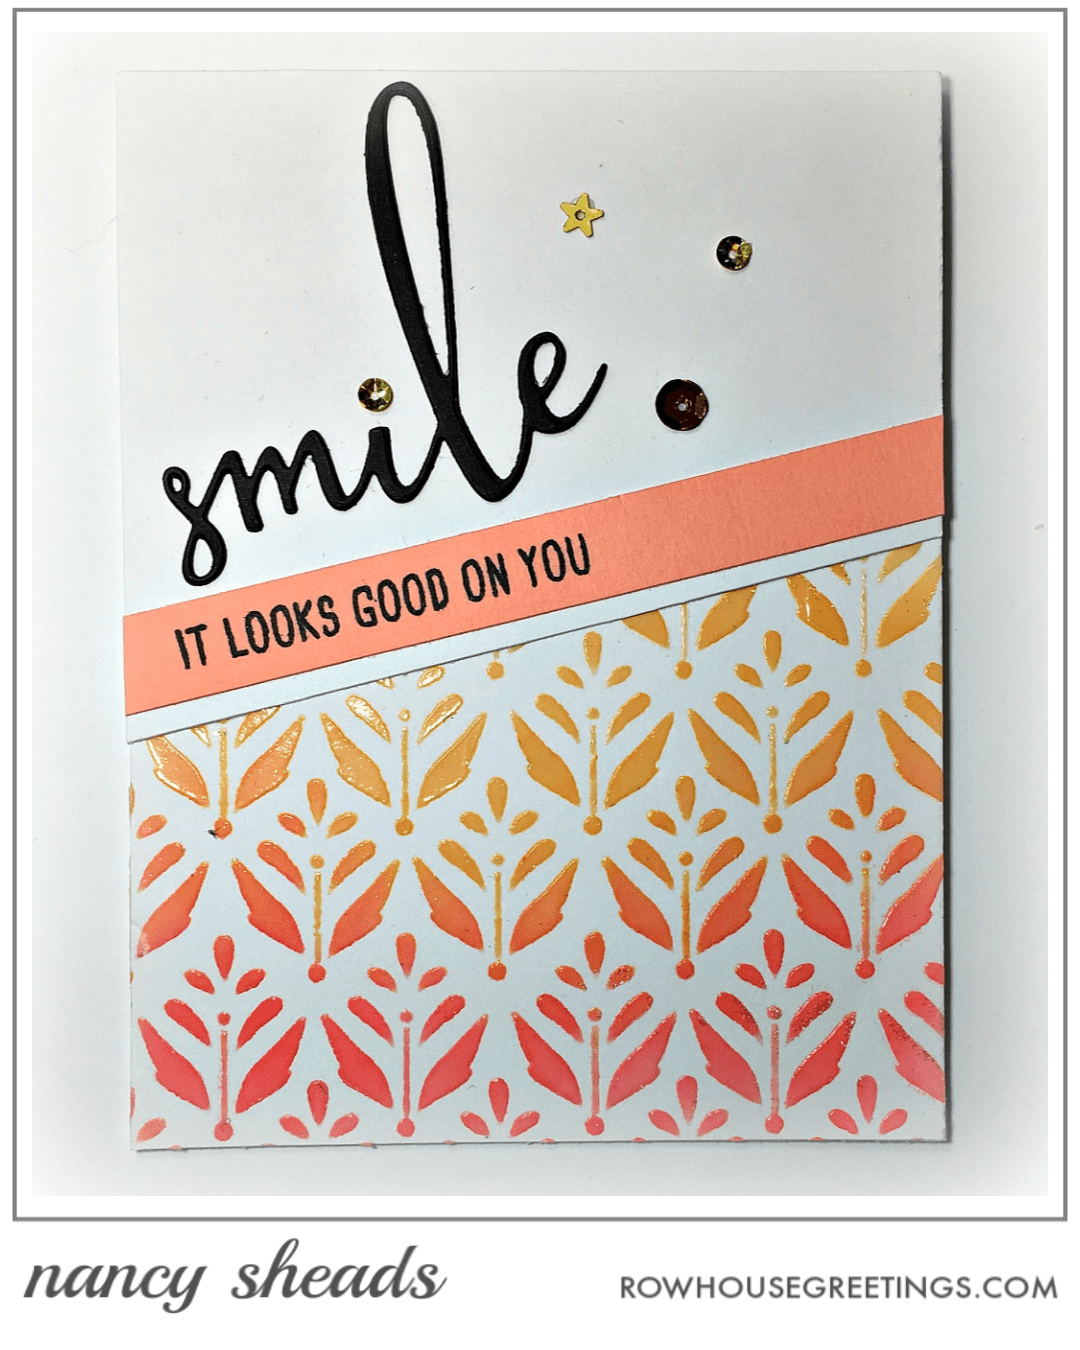
Stamp: Smile by Honey Bee Stamps Ink: Distress Inks in Worn Lipstick and Scattered Straw by Ranger – Tim Holtz Stencil: Summertime Bloom by Echo Park Paper Co. Embellishments: Sequins by 28 Lilac Lane in Heavy Metal
Ink: Distress Inks in Worn Lipstick and Scattered Straw by Ranger – Tim Holtz; Versamark by Tsukineko Stencil: Summertime Bloom by Echo Park Paper Co. Die: Large Thanks by Honey Bee Stamps Embellishments: Embossing Powder in Marigold by Ranger; Sequins by 28 Lilac Lane in Heavy Metal
Stamp: Thanks A Bunch by Honey Bee Stamps Ink: Archival Ink in Jet Black
by Ranger Stencil: Summertime Bloom by Echo Park Paper Co. Die: Small Stitched Rectangle Stackables by Lawn Fawn Embellishments: Nuvo Embellishment Mousse in Custard Cream
Stamp: Bloom by Honey Bee Stamps Ink: Archival Ink in Jet Black by Ranger Die: Bloom by Honey Bee Stamps Stencil: Summertime Bloom by Echo Park Paper Co. Embellishments: Dreamweaver Embossing Paste by Stampendous
Stamp: Thanks A Bunch by Honey Bee Stamps Ink: Archival Ink in Jet Black by Ranger; Distress Inks in Worn Lipstick and Scattered Straw by Ranger – Tim Holtz Stencil: Summertime Bloom by Echo Park Paper Co. Embellishments: Dreamweaver Embossing Paste by Stampendous; Sequins in Heavy Metal by 28 Lilac Lane
Stamp: Smile by Honey Bee Stamps Die: Smile by Honey Bee Stamps Stencil: Summertime Bloom by Echo Park Paper Co. Ink: Distress Inks in Worn Lipstick and Scattered Straw by Ranger – Tim Holtz Embellishments: Texture Paste in Transparent Gloss by Ranger; Sequins in Heavy Metal by 28 Lilac Lane
Ink: Distress Inks in Worn Lipstick and Scattered Straw by Ranger – Tim Holtz Die: Hello by Honey Bee Stamps Stencil: Summertime Bloom by Echo Park Paper Co. Embellishments: Glitz Glitter Gel in White by Gina K. Designs
Just finished up another class at The Queen’s Ink featuring stamps from RubberMoon and lots of mixed media products. Stay tuned for details on the August class! Hope to see you there!
Supplies
Disclosure: Below are the supplies I’ve used for today’s project. All items were personally purchased except those marked with an asterisk (*) which were provided by a store or design team. I never share a product I do not like. All opinions are my own. Read more.
Where available I use compensated affiliate links, meaning that at no cost to you I receive a commission if you click through and make a purchase. I use this money to support my blog. If you like my projects, please consider supporting me by clicking through these links when you shop. Thanks so much! Read more.
Paper: Neenah Solar White 110#; Distress Watercolor Cardstock by Ranger / Tim Holtz; Hammermill Copier Digital Cover, 100# Stamps: Squidbrella by Rubber Moon; Under the Weather by Rubber Moon Inks: Amalgam Ink in Jet Black by Gina K. Designs; Archival Ink in Jet Black by Ranger; Distress Inks in Twisted Citron, Evergreen Bough,and Broken China Stencils: 108PA Stencil (by Scrapcosy) by Paper Artsy; Circle 6 by Stencil Girl Embellishments: Dina Wakely Media Washi Tape – Set 1 by Ranger; Nuvo Embellishment Mousse in Indian Gold by Tonic Studios; Fuzzy Fun Flock in Cotton Ball White by Stampendous; Nuvo Glitter Drops in Honey Gold by Tonic Studios; Nuvo Glue Pen by Tonic Studios Copics: E000, E01, E11, E04, BV00 (skin); BV00, BV01, B00 (hair); YG13, YG17, E04 (squidbrella); B00, B02 (coat); R24 (socks)
Paper: Neenah Solar White 110#; Distress Watercolor Cardstock by Ranger / Tim Holtz; Hammermill Copier Digital Cover, 100# Stamps: Funbrella (*) by Rubber Moon; Poppies by Rubber Moon; You’ve Got This by Rubber Moon Inks: Amalgam Ink in Jet Black by Gina K. Designs; Archival Ink in Jet Black by Ranger; Distress Inks in Twisted Citron and Evergreen Bough Stencils: Circle 6 by Stencil Girl Embellishments: Queen’s Ink Washi Tape in Harlequin and Let Them Eat Cake; Nuvo Embellishment Mousse in Fresh Copper by Tonic Studios; Nuvo Crystal Drops in Red Berry, English Mustard, and Midnight Blue by Tonic Studios; Nuvo Glue Pen by Tonic Studios Copics: E000, E01, E11, E04, BV00 (skin); BV00, BV01, B00 (hair); YG13, YG17, B00, B02, E04 (funbrella); B00, B02, YG13, YG17 (coat)
Paper: Neenah Solar White 110#; Distress Watercolor Cardstock by Ranger / Tim Holtz; Hammermill Copier Digital Cover, 100# Stamps: BFFs by RubberMoon; You Need A Hug by RubberMoon Inks: Amalgam Ink in Jet Black by Gina K. Designs; Archival Ink in Jet Black by Ranger; Delicata in Golden Glitz by Tsukineko; Distress Inks in Twisted Citron, Broken China, and Evergreen Bough Dies: Small Cross Stitched Rectangle Stackables by Lawn Fawn; Mini Picture Frames by Lawn Fawn Stencils: Micro Hearts by The Crafters Workshop Copics: E000, E01, E11, E04, BV00 (skin); BV00, BV01, B00 (hair); YG13, YG17, B00, B02, R24 (clothing)
Join me for a new workshop where we will be playing with stencils to create beautiful backgrounds for quick and easy cards. In this class, you will create seven stenciled backgrounds using various techniques and gel mediums that you can transform into lovely greeting cards with the addition of sentiments and die cuts from Honey Bee Stamps.
CLASS FEE $35 (includes stencil from Echo Park Paper Co. to add to your personal stash).
Photo Scraps 1213 Liberty Road | Eldersburg, MD 21784 phone: 410-549-5187 | web: http://photoscraps.blogspot.com Wednesday, July 31, 2019 – 1:00 PM to 3:00 PM Saturday, August 3, 2019 – 1:00 PM to 3:00 PM Please call Photo Scraps at 410-549-5187 to register.
NOTE: You will be able to assemble at least two cards in class. However, since gel mediums have varying dry times, you may need to complete the assembly of some of your cards at home.
BRING TO CLASS
You will need the following supplies for class. Please contact Photo Scraps in advance of class if you need any of the craft supplies on the list. If you wait until class time, you may not be able to purchase the supplies you’ll need to participate in class.
Distress Oxide ink pads in Worn Lipstick and Scattered Straw (you can substitute Squeezed Lemonade for Scattered Straw if necessary)
Versamark Ink Pad (either a regular sized pad or mini)
Three ink blenders (such as Ranger Ink Blending Tools, Nuvo Blending Sponges, Picket Fence Blending Brushes, etc.)
Paper trimmer
iCraft Purple Tape
Paper towels
Baby wipes
Scissors
Foam Squares (such as Gina K. Designs Foam Squares or Scrapbook Adhesives 3-D Squares)
Tape runner
Liquid glue that dries clear (such as Connect Glue by Gina K. Designs or Ranger Multi Medium Matte)
GOOD MORNING FRIENDS! I’ve got quite a long blog post for you today so you better pull up a chair and grab a cup of your beverage of choice. I don’t often write tutorials, but today’s project was worth the extra effort.
Saturday was the first day in quite awhile that I didn’t have anything planned, so I spent the day on a project that I’ve been mulling about over the past few days. I’ve been inspired lately by the work of my student Jill Killeen who has been creating fun shadow boxes with Stamping Bella stamps.
As you know, I’ll be teaching a class at The Queen’s Ink on Tuesday, June 25th featuring the Oddball Queens from Stamping Bella. After I prepared the class samples, I realized that The Queen’s Ink now has its own exclusive line of washi tape which would have been perfect for the class cards. So I wanted to put together another project featuring the Oddball Queen of Hearts by Stamping Bella and the new washi tapes from The Queen’s Ink. I happened to have a RIBBA 9×9 frame from IKEA which is perfect for shadow boxes so my idea for this project started coming together. It was also the perfect opportunity try out some new crafting tools and products that I had recently purchased.
So here it is! I was going to apologize for the shadows, but after all, it IS a shadow box!
The full supply is shown below. I’ll tell you up front that the design evolved along the way with a lot of experimentation. As a result, I threw a lot of different products at it. But don’t let the extensive supply list scare you. We all know that the ancillary hobby to papercrafting is collecting papercraft supplies. So you probably already have a lot of the supplies in your stash or have products that you could easily substitute.
Before Starting….
Before I started, I cut my card stock and foam sheets (see supply list) as follows:
One 9 x 9 inch square from a 12 x 12 sheet of Graphic 45 Loveliest of Them All
One 6 x 6 inch square from a sheet of Bazzill Black Licorice card stock
One 5.75 x 5.75 inch square from a sheet of Neenah 80# card stock
One 5.75 x 5.75 inch square from a sheet of Darice White Foam Sheet
One 5.5 x 5.5 inch square from a sheet of Darice White Foam Sheet
The Background
I wanted to create the background by building up layers of colors and textures. I recently purchased some of the Picket Fence Studios Life Changing Blender Brushes so this seemed like a great opportunity to try them out. On a 5.75 x 5.75 inch sheet of white card stock, I started blending Distress Inks in Tea Dye, Tattered Rose, and Antique Linen. After the ink dried, I splattered the background with Nuvo Mica Mist in Nebula Blue, Fresh Pear, Antique Gold and Violet Lustra.
One of the new crafting tools in my stash is the Wendy Vecchi Make Art Stay-tion. I thought this would be perfect for stenciling since the magnets would hold the stencil in place without tape. I spread a thin layer of Tacky-When-Dry Gel Medium from The Crafters Workshop on portions the Tim Holtz Gradient Square Layering Stencil with a palette knife. Afterwards, I immediately cleaned the stencil and palette knife with water and set the background aside to dry.
In the meantime, I covered a couple of scraps of white card stock with the new washi tapes exclusive to the Queen’s Ink — Crowns, Let Them Eat Cake, Lavender Baroque, Queen of Hearts, and Harlequin. I used the Hearts die and the Small Stitched Circle Stackable die from Lawn Fawn to cut the cardstock into shapes. Later on, I only used the die cut circles so I’ll save the hearts for another project.
And now – the fun part! True to it’s name, the gel medium is tacky when dry so I started to lay down gold, silver, and copper gilding flakes on the stenciled area. Once the stenciled area was covered, I rubbed lightly to adhere the flakes to the gel medium and remove any excess. I was going to take a photo midway, but to be honest I was up to my elbows in gilding flakes so I can only show the end result. Difficult to photograph, but lots of texture and shine.
Putting It Together
I was running out of room in my work space so I started arranging and adhering all of the layers for the full background. I decided that the lower right corner of the background needed something extra so I stamped an image from Carabelle Studios’ Stains & Seams stamp set with Archival Ink in Jet Black.
Next:
I glued the pre-cut 5.5 inch square foam sheets to the back of the white cardstock (top layer).
I glued the pre-cut 5.75 inch square foam sheet to the back of the black cardstock (middle layer).
I stamped the sentiment in Versafine along the bottom of the 9 x 9 design paper square. I covered the ink with clear embossing powder and heat set the image (bottom layer).
I lined up the bottom layer on my Wendy Vecchi Make Art Stay-tion and held the paper in place with the magnets.
Using the magnetic ruler, I lined up and centered the three layers. Once they were in place, I glued the layers together.
I placed foam adhesive squares on the back of the die cut washi tape circles and arranged them on the top layer.
At this point, the background is complete as shown below. Time to start the Copic coloring!
Copic Coloring
To start, stamp the image on Hammermill Digital Color Copy (or any Copic compatible paper) with Amalgam Ink in Jet Black by Gina K. Designs. I’m providing only basic instructions here for coloring, but if you need additional help, take a look at the video by Elaine Hughes (AKA Marker Geek) for coloring this stamp. I was guided in part by her color selection so you will see many of the same markers.
Skin
Working from dark to light, add depth and shading to the face (E04, E11, E01, E000)
Base coat the eye lids with BV31. Deepen the corners with BV34.
With BV31, draw a line under the lid to create a shadow across the eye.
Use BV31 to deepen the shadows around the eyes and the hairline.
Hair & Crown
For the hair, start with C7 to color the shadows at the base of the curls.
Work from dark to light (C5, C3, C1) to blend out each section of hair. Be sure that you do not lose the highlights.
For the crown, work from dark to light (Y19, Y15, Y02)
Base coat the heart with R24. Add R46 if you want to deepen the color.
Clothing
Starting with the folds in the dress, work from dark to light (R59, R46, R24) concentrating the R59 in the shadows and folds in the dress. Blend out with R46 and R24.
If you want additional depth, add C5 to the deepest areas and blend out from dark to light as necessary with the R markers.
For the center of the dress, work dark to light (Y19, Y15, Y02). Do the same with the binding (C7, C5, C3).
Base coat the hearts with R24. Add R46 if you want to deepend the color.
Bringing It On Home!
Once the coloring was complete, I used my Brother Scan N Cut to cut out the image. If you prefer, you could fussy cut the image. As an alternative, coordinating dies are available from Stamping Bella (see links below). Once the image was cut, I added foam adhesive squares to the back and adhered it to the background. After adding some sequins and jewels for extra bling, I framed the finished piece.
That’s it for today – hope you found a some inspiration. And be sure you check out Jill’s blog and send her a little love!
Disclosure: Below are the supplies I’ve used for today’s project. All items were personally purchased except those marked with an asterisk (*) which were provided by a store or design team. I never share a product I do not like. All opinions are my own. Read more.
Where available I use compensated affiliate links, meaning that at no cost to you I receive a commission if you click through and make a purchase. I use this money to support my blog. If you like my projects, please consider supporting me by clicking through these links when you shop. Thanks so much! Read more.
Supplies
Paper: Hammermill Digital Color Copy 100#; Bazzill Cardstock in Licorice Twist; Princess Collection Loveliest of All by Graphic 45 Stamp: Oddball Queen of Hearts by Stamping Bella; Stains & Seams by Carabelle Studios Inks: Amalgam Ink in Jet Black by Gina K. Designs; Archival Ink in Jet Black by Ranger; Versafine in Onyx Black by Tsukineko; Distress Inks in Tea Dye, Antique Linen, and Tattered Rose Stencil: Gradient Square Layering Stencil by Stampers Anonymous / Tim Holtz Washi Tapes: Washi tape in Crowns, Let Them Eat Cake, Lavender Baroque, Queen of Hearts, and Harlequin by The Queen’s Ink Dies: Small Stitched Circle Stackables by Lawn Fawn Embellishments: Nuvo Mica Mist by Tonic Studios in Fresh Pear, Nebula Blue, Violet Lustra, and Antique Gold; Nuvo Gilding Flakes by Tonic Studios in Radiant Gold, Silver Bullion, and Sunkissed Copper; Nuvo Fine Detail Embossing Powder in Clear by Tonic Studios; Sequins in Not So Heavy Metal by 28 Lilac Lane; Wink of Stella in Clear by Zig; miscellaneous enamel dots. Adhesives: Tacky-When-Dry Gel Medium by The Crafters Workshop; Therm O Web White Adhesive Foam Squares by Gina K. Designs; 3-in-1 Craft Glue by Beacon Frame: RIBBA 9 x 9 frame available from IKEA Tools: Life Changing Blending Brushes by Picket Fence Studios; Wendy Vecchi Make Art Stay-tion by Ranger; Misti Stamping Tool by My Sweet Petunia; Brother Scan N Cut Copics: E000, E01, E04, BV31, BV34 (skin); C1, C3, C5, C7 (hair); Y02, Y15, Y19, R24, R46 (crown); R24, R46, R59 C5, Y02, Y15, Y19 (dress)
Good morning friends! I’m off to a rocky start today. I just broke my glasses so everything is a little blurry right now. So please excuse any typos! Hopefully my project photo is in focus!
I’m back today with my first project for the Altenew Educator Certification Program Level I classes. This project is based on a variation of Lesson Two in the Celebration: Stencil Techniques class. My project features Altenew’s Leaf Burst Stencil and Halftone Hello stamp and die set. I began by stenciling the leaf design on watercolor paper with Distress Inks. Then I applied transparent glossy embossing paste through the stencil which slightly mutes the colors of the Distress Ink. I purposely offset the sentiment and die cut to the right so that they would not distract from the central part of the stenciled design.
I’m not quite ready to let go of warm weather so I decided to use lighter spring colors instead of the golds, browns, and oranges that characterize fall. Besides, this is one of my favorite Distress Ink combinations. I also love using embossing paste for the extra texture and dimension it adds to a card design.
To create the stenciled image:
Cut a piece of watercolor paper to 4 inches x 5.25 inches.
Tape the Leaf Burst Stencil to the watercolor paper, offset to the left.
Working from the center outward, blend Distress Inks through the stencil in the following order: Salty Ocean, Cracked Pistachio, Shabby Shutters, and Mowed Lawn.
With the stencil still in place, apply an even coat of Ranger Texture Paste (transparent gloss) with a palette knife. The texture paste will appear milky in color but will dry clear and glossy.
Carefully remove the stencil. Rinse the stencil and palette knife to remove any remaining texture paste.
Set the stenciled image to the side to dry for at least 30 minutes.
To create the sentiment:
Cut a piece of vellum 5/8 inch x 5 inches.
Stamp the sentiment on the vellum using Ranger Archival Ink. Allow to dry.
Stamp the Hello image using Ranger Archival Ink. Cover with clear embossing powder and heat set.
Die cut the Hello image and glue to vellum strip.
To complete the card:
Adhere vellum strip with sentiments to card, wrapping edges of vellum around the edges of card.
Glue a piece of craft foam (cut to 3.75 inches x 5 inches) to the back of the stenciled image. I use craft foam rather than foam tape because it provides even support across the entire card.
Glue image layer to a top folding card base.
That’s all for today. Thanks so much for stopping by. Hope you find some inspiration in the simplicity of this project.
Disclosure: Below are the supplies I’ve used for today’s project. All items were personally purchased except those marked with an asterisk (*) which were provided by a store or design team. I never share a product I do not like. All opinions are my own. Read more.
Where available I use compensated affiliate links, meaning that at no cost to you I receive a commission if you click through and make a purchase. I use this money to support my blog. If you like my projects, please consider supporting me by clicking through these links when you shop. Thanks so much! Read more.
Supplies
Paper: Neenah Solar White 110#; Canson 140# Watercolor Paper; White Vellum by Bazzill Stamp: Halftone Hello by Altenew Die: Halftone Hello Die by Altenew Stencil: Leaf Burst Stencil by Altenew Inks: Distress Inks in Salty Ocean, Cracked Pistachio, Shabby Shutters, Mowed Lawn; Ranger Archival Ink in Jet Black Embellishments: Ranger Texture Paste – Transparent Gloss